The Ultimate Classic Meat Pie Recipe: A Savory Beef & Pork Masterpiece
Table of Contents
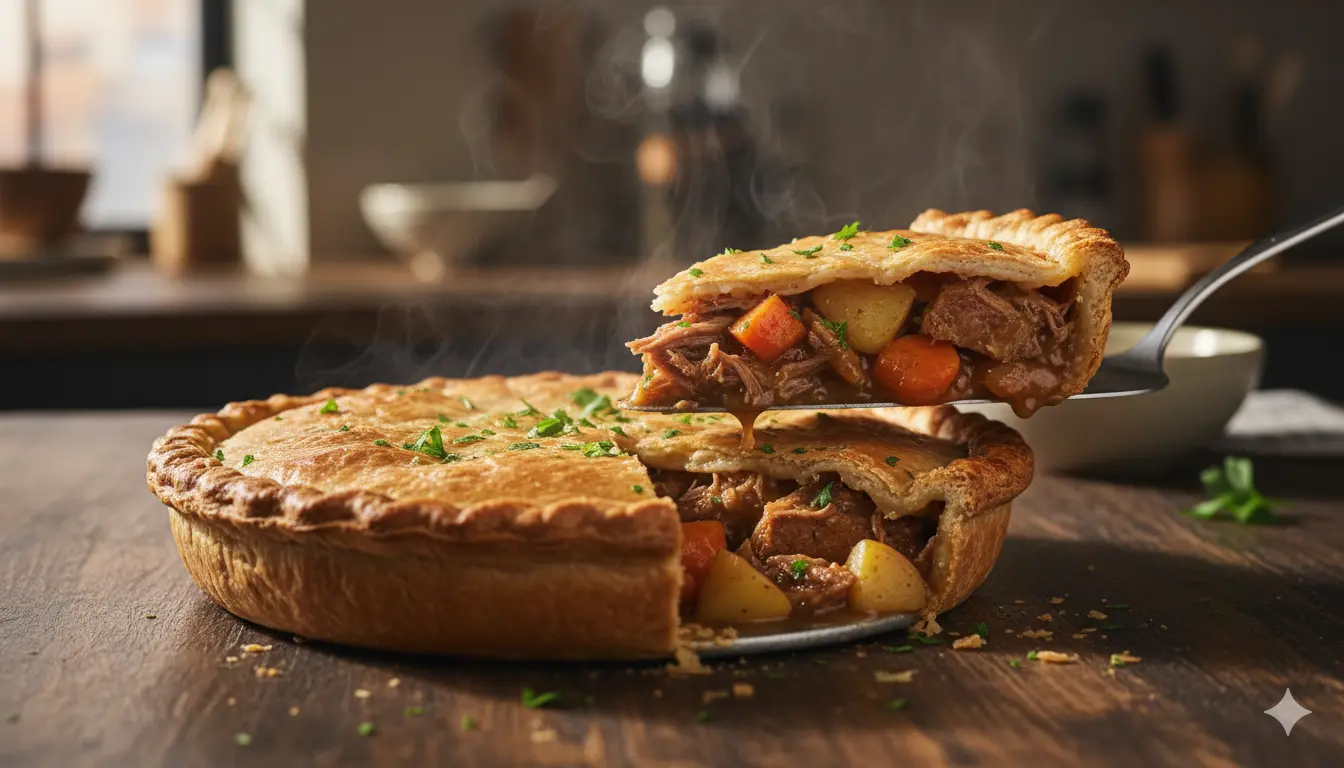
There are few things in this world that communicate “home” quite like the scent of a savory pie baking in the oven. It’s a sensory time machine, isn’t it? The moment that rich aroma of simmering beef, savory pork, and buttery pastry hits the air, you aren’t just in your kitchen anymore. You’re back at your grandmother’s Sunday table, or sitting in a warm pub on a rainy afternoon, or perhaps gathered with your own family, watching eager faces wait for that first golden slice to be lifted from the dish.
Cooking is an act of love, and a meat pie is a labor of love. It requires patience to chill the dough and time for the filling to thicken, but the reward is a dish that wraps you in comfort. This isn’t just dinner; it’s a centerpiece that says, “I made this for you.” Whether you are an experienced baker or trying your hand at pastry for the first time, this Meat Pie Recipe is here to guide you toward creating a memory on a plate.
Why This Beef & Pork Meat Pie Recipe Works
You might wonder why we are mixing meats here. Why not just stick to beef? While an all-beef pie is delicious, combining beef and pork creates a depth of flavor that a single protein often misses.
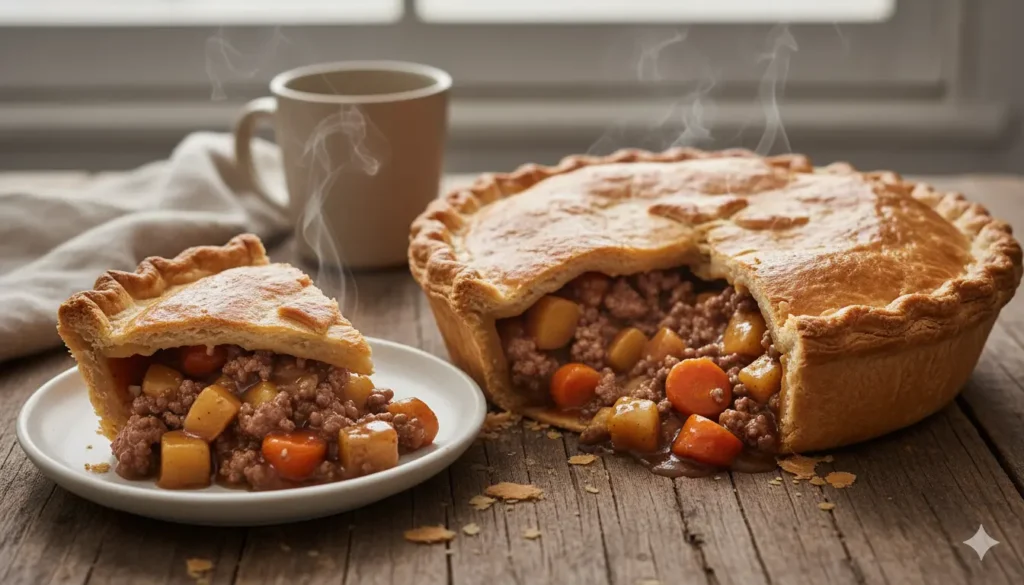
- Flavor Balance: The ground beef brings that deep, iron-rich meatiness that serves as the foundation. The pork, on the other hand, usually carries a higher fat content and a natural sweetness. This fat renders out, basting the lean beef and vegetables from the inside.
- Texture: Texture is king in a savory pie. You want a filling that holds together without being a solid brick, and you want a sauce that is silky, not watery. The combination of root vegetables and the natural gelatin from the broth creates a lush interior that contrasts perfectly with the crisp, golden exterior.
Essential Equipment for Baking
Before you get your hands floury, you need to make sure your station is ready. You don’t need a professional bakery setup, but having these specific tools within arm’s reach will save you stress later.
- 9-inch Deep Dish Pie Plate: Standard pans are fine, but a deep dish ensures you don’t have spillover.
- Large Skillet or Dutch Oven: You need plenty of surface area to brown the meat properly.
- Rolling Pin: Essential for getting that pastry thin and even.
- Pastry Brush: For applying the egg wash.
- Food Processor (Optional): You can cut butter in by hand, but a processor speeds up the crust-making process significantly.
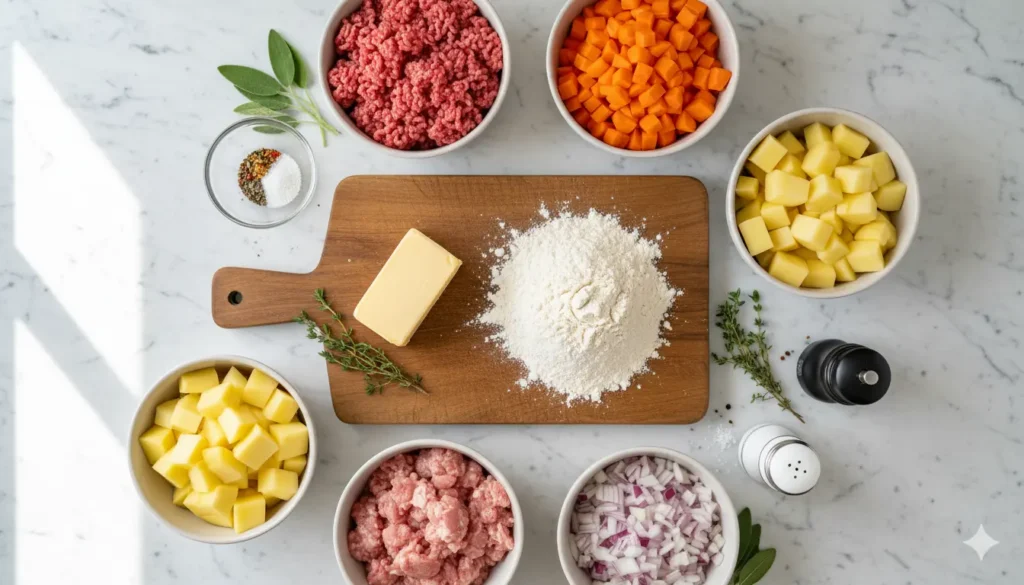
Ingredients Checklist
Great meals start with great ingredients. Since this is a rustic dish, you don’t need fancy truffles or expensive wines. You just need fresh basics handled well.
The Savory Filling & Buttery Crust
Here is exactly what you need to gather.
| Component | Ingredient | Quantity | Notes |
| The Meat | Ground Beef (80/20) | 1 lb (450g) | For robust flavor |
| Ground Pork | 1/2 lb (225g) | For fat and moisture | |
| Vegetables | Onion (Yellow) | 1 large | Finely chopped |
| Potatoes (Yukon Gold) | 2 medium | Diced small (1/2 inch) | |
| Carrots | 2 medium | Diced small | |
| The Sauce | Beef Broth | 1 cup | Low sodium allows you to control salt |
| Worcestershire Sauce | 1 tbsp | Adds essential umami depth | |
| All-Purpose Flour | 2 tbsp | To thicken the gravy | |
| Garlic | 2 cloves | Minced | |
| The Crust | All-Purpose Flour | 2.5 cups | Plus extra for rolling |
| Unsalted Butter | 1 cup (2 sticks) | Must be ice cold, cubed | |
| Ice Water | 6-8 tbsp | Use only enough to bind | |
| Egg Wash | 1 egg + 1 tbsp water | For that glossy golden finish |
Step-by-Step Instructions for the Perfect Meat Pie Recipe
Don’t let the length of the list intimidate you. We are going to break this down into three manageable phases: The Pastry, The Filling, and The Bake.
Step 1: Preparing the Flaky Pastry
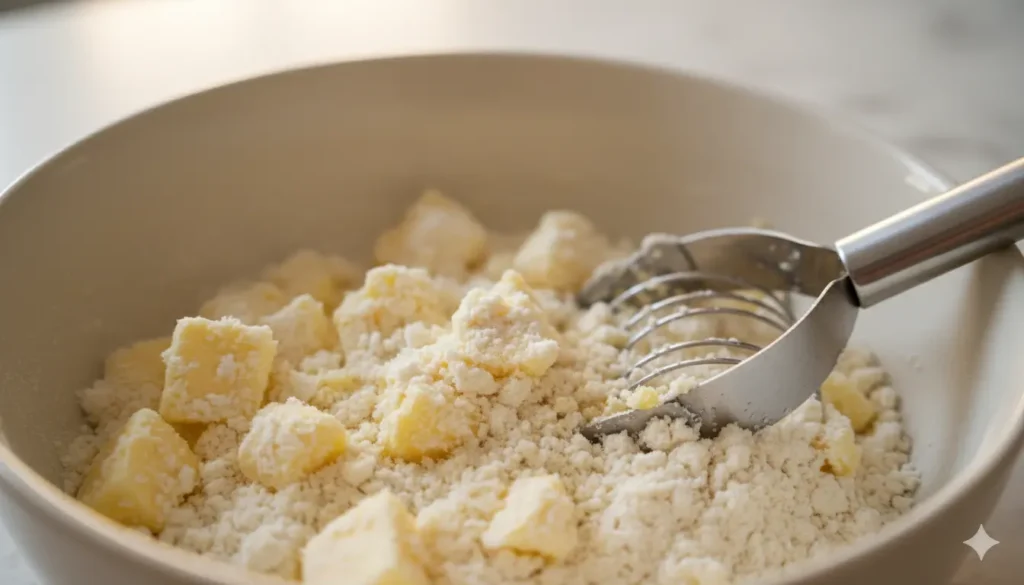
The crust is often the part that scares home cooks the most, but the secret is simple: Keep everything cold.
- Cut the Butter: In a large bowl, mix your 2.5 cups of flour with a pinch of salt. Add the cubed, cold butter. Use a pastry cutter or your fingers to work the butter into the flour. You stop when the mixture looks like coarse breadcrumbs with some pea-sized chunks of butter remaining. Those chunks are what create the flaky layers.
- Bind the Dough: Drizzle in the ice water, one tablespoon at a time, mixing gently with a fork.
- Test the Texture: Squeeze a bit of dough in your hand. If it holds together, stop adding water. If it crumbles, add one more tablespoon.
- Chill: Divide the dough into two disks (one slightly larger for the bottom), wrap them in plastic, and refrigerate for at least 30 minutes. This relaxes the gluten so your crust won’t be tough.
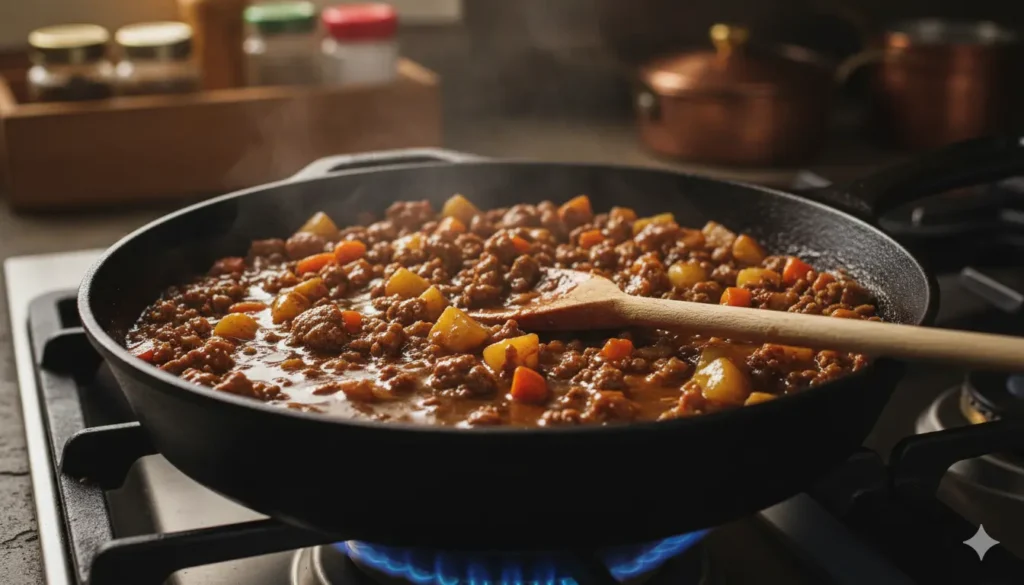
Step 2: Making the Savory Beef and Pork Filling
While the dough chills, you can turn your attention to the stovetop.
- Sauté Aromatics: Heat a splash of oil in your skillet over medium heat. Add the onions and cook until they are soft and translucent (about 5 minutes). Add the minced garlic for the last minute so it doesn’t burn.
- Brown the Meat: Increase the heat to medium-high. Add the beef and pork. Use a wooden spoon to break it apart while cooking. You want it browned, not steamed, so don’t stir it constantly—let it get some color.
- Add Veggies: Toss in your diced potatoes and carrots. Stir them in so they’re coated with the rendered fat.
- Make the Gravy: Sprinkle the 2 tablespoons of flour over the meat and vegetable mixture. Stir well and cook for 1-2 minutes to get rid of the raw flour taste.
- Simmer: Pour in the beef broth and Worcestershire sauce. Scrape the bottom of the pan to release those tasty browned bits (the fond). Lower the heat and let it simmer for 5-10 minutes until the sauce thickens.
- Cool Down: This is critical. Remove the pan from the heat and let the filling cool completely. If you put hot filling into a cold raw crust, the butter will melt instantly, and you will end up with a soggy bottom.
Step 3: Assembling and Baking
Now comes the fun part where it all comes together.
- Preheat: Set your oven to 400°F (200°C).
- Roll the Bottom: Take the larger disk of dough from the fridge. On a floured surface, roll it out into a 12-inch circle. Carefully drape it into your pie dish.
- Fill: Spoon your cooled meat mixture into the shell. Spread it evenly.
- Top Crust: Roll out the second disk. Place it over the filling. Trim the excess hanging off the edges.
- Seal: Press the top and bottom crust edges together and crimp them with your fingers or a fork.
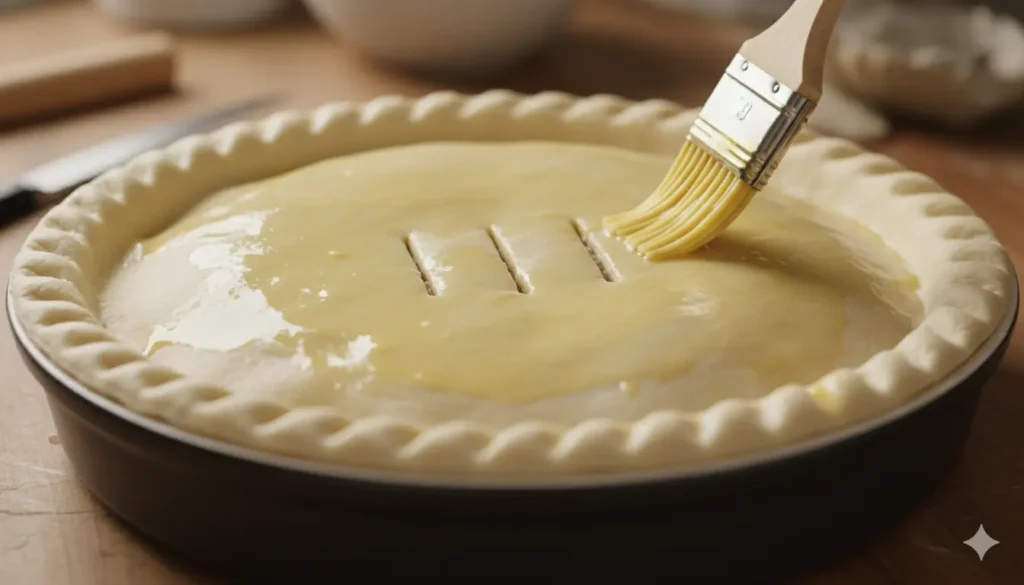
- Vent: Cut 3 or 4 slits in the top of the pie. This allows steam to escape so the pie doesn’t explode or get soggy.
- Gloss: Brush the top crust generously with your egg wash.
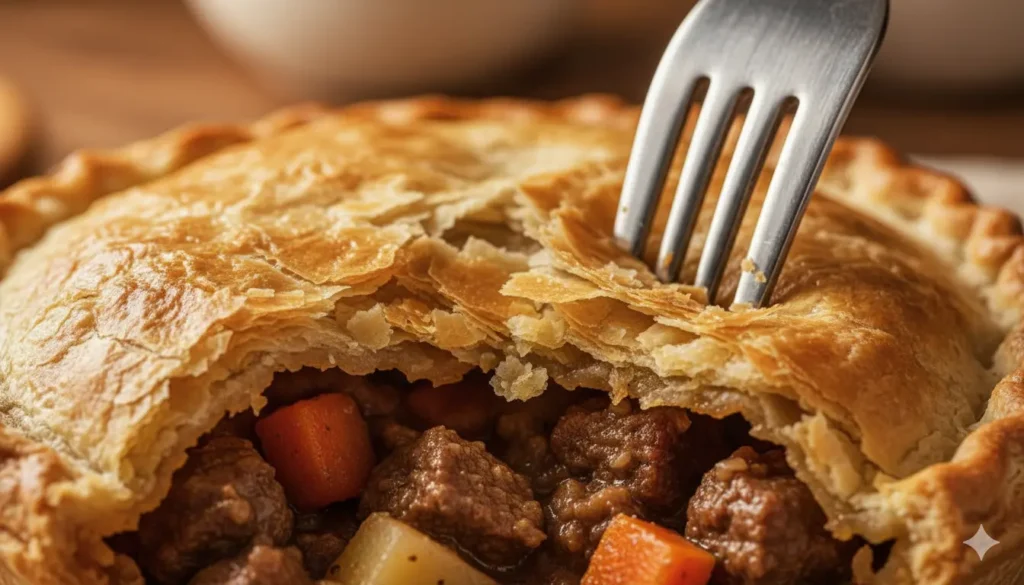
- Bake: Place the pie on a baking sheet (to catch drips) and bake at 400°F for 20 minutes. Then, reduce the heat to 350°F (175°C) and bake for another 35-45 minutes until the crust is deep golden brown.
Expert Tips for the Best Meat Pie
- Temperature Control: If your kitchen is hot, put the butter in the freezer for 10 minutes before starting. If the dough gets sticky while rolling, put it back in the fridge for a bit.
- Season as You Go: Potatoes absorb a lot of salt. Make sure you taste your filling before adding the raw egg/flour thickener to ensure it’s seasoned enough.
- Rest Before Cutting: When you take the pie out of the oven, let it rest for at least 15 minutes. This allows the juices to redistribute and thicken slightly so the slice holds its shape on the plate.
Variations to Customize Your Dish
Once you master this classic meat pie recipe, you can make it your own.
- Vegetable Swaps: Not a fan of carrots? Swap them for frozen peas (add them at the very end so they don’t get mushy) or corn. Celery is also a great addition for extra crunch.
- Meat Swaps: You can use ground lamb for a Shepherd’s Pie twist, or even leftover roast chicken for a lighter version.
- Spice It Up: If you like heat, add a pinch of cayenne pepper or some red pepper flakes to the meat while browning.
Storing and Reheating Leftovers
Believe it or not, meat pie often tastes better the next day as the flavors meld.
- Refrigerator: Wrap leftovers tightly or store in an airtight container. They will keep for 3 to 4 days.
- Freezer: You can freeze the baked pie for up to 3 months. Slice it first so you can serve individual portions.
- Reheating: Avoid the microwave if you want to keep the crust flaky. Place slices on a baking sheet and warm them in a 350°F oven for 15-20 minutes.
Frequently Asked Questions (FAQ) about Meat Pie Recipes
Can I freeze this meat pie recipe before baking?
Yes! Assemble the pie completely (up to the egg wash step), then wrap it tightly in plastic wrap and foil. You can freeze it for up to 2 months. When you are ready to eat, bake it from frozen, just add about 15-20 minutes to the baking time.
Q: What’s the secret to a flaky crust for a meat pie?
Cold butter and minimal handling. If you overwork the dough, you develop too much gluten, making it tough. If the butter gets warm, it blends into the flour rather than creating layers. Keep it cold, keep it quick.
Can I use store-bought crust for this meat pie recipe?
Absolutely. We all have busy days. While homemade is best, a high-quality refrigerated pie crust works very well. Just make sure to let it sit on the counter for 10 minutes before unrolling so it doesn’t crack.
Conclusion
The beauty of this Classic Savory Meat Pie with Beef & Pork lies in its versatility and the deep sense of satisfaction it brings. It’s a dish that demands you slow down and enjoy the process, resulting in a meal that is hearty, delicious, and undeniably comforting. Whether for a holiday gathering or a cozy Sunday night, this recipe is sure to become a staple in your kitchen rotation.
Now, it’s your turn! Have you tried this combination of beef and pork before, or do you have a secret ingredient you swear by? Drop a comment below and let us know how your pie turned out—we’d love to hear from you!